Expand A Logical Volume In LVM
Abstract
This blog is used to record the instructions about how to expand a logic volume in lvm.
CAUTION!
- What I write here may not completely right because there have been one month passed since I complete migrate my data to SSD.
- Resize volume may cause data lost, so be carefully.
- Your warranty is now void. I am not responsible for bricked devices, dead SD cards, thermonuclear war, or you getting fired because the alarm app failed and anyother errors.
- Do some research before you do this.
Start
To imporve my notebook’s performance, I bought a SSD to speed up my notebook’s response speed. Before I start to usd the new inserted SSD to my notebook. The device mapper is like what below picture shows.
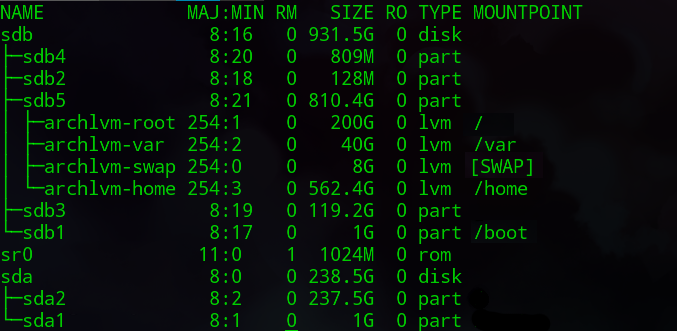
As the pic shows, sda is the new SSD, sdb is the old hdd, it set sdb3 as boot, set the sdb5 as the lvm physical volume, and create a volume group named archlvm, in the archlvm volume, there four logical volumes:
- root. Mounted to the “root” point.
- var. Mounted to the “/var” point.
- swap. Used as the SWAP File.
- home. The largest logical volume, used to store all of my files.
Now what I want to do is:
- Let sda1 be mounted to “/boot” point.
- Migrate contents in archlvm-root to sda2, and then let sda2 be mounted to “/” point.
- Delete logical volume archlvm-root, and then expand archlvm-home to use all the free space we get after delete archlvm-root.
The following content will show you how to do this.
Preparing
To complete all the missions, we need a archlinux-live-usb.
- Download a archlinux iso here. If you are not in China, choose other mirrors :).
- Create a live-USB.
- For UEFI Support, it’s highly recommended to use Rufus to create the Live-USB.
Migrate “/Boot” and “Root”
- Mount the partions like below:
|
|
Then run this command in shell:
|
|
wait the command complete. Then reboot into Live-USB.
- Mount the partions like below:
|
|
- turn on the swap
|
|
- Regenerate the fstab(Remember to check it, it there is something wrong in it, you may can’t boot after reboot without Live-USB)
|
|
A classic fstab can be found in ArchLinux WIKI, the UUID you may need can be get by command blkid
- arch-chroot to “/mnt”
- Reinstall Grub to sda
|
|
After do this, we should not run grub-mkconfig immediately, because we haven’t expand the “archlvm-home”.
Expand Logical Volume
As I said, what I want is deleting archlvm-root, and expand archlvm-home with the space the being deleted archlvm-root has. Now let’s follow below step to reach this goal.
- Exit the arch-chroot
- Unmount all the logical volumes in group archlvm.(CAUTION: This must be done, or you may get error.)
- Delete archlvm-root
|
|
- expand archlvm-home
|
|
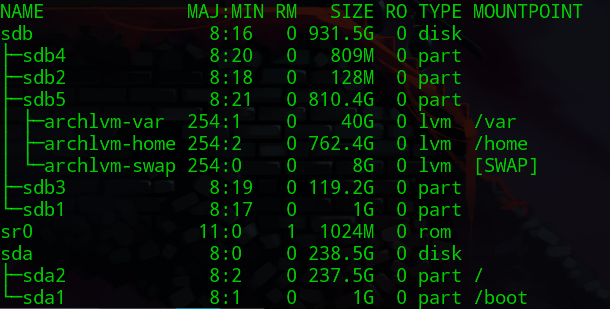
After do this, the archlvm-home will take all the free space freed by delete archlvm-root.
- resizefs(CAUTION: Althrough it does not cause any error in my notebook, but I know it may cause some error in some scenarios.) After we execute lvresize, we need to resize filesystem to let system know the change.
|
|
In somecase, the resize2fs may say that you should run command e2fsck first. If you get this, run it. (CAUTION: Althrough it does not cause any error in my notebook, but I know it may cause some error in some scenarios.)
|
|
After this complete, you can run command resize2fs.
Complete
If all the steps are completed successfully, there is only one instruction we need to do——grub-mkconfig
|
|
Reboot your computer, now we should migrate our data to SSD and expand logical volume archlvm-home successfully.
Tips:
- Some device may have a legacy entry in EFI loader table. You can delete it in UEFI safely.
- If you found anything wrong about device mapper, check your fstab, it is in “/etc/fstab”, to modifiy it, you’d better reboot into the Live-USB again.